Go into any hardware store now and you will see shelves of tool belts that are under 30 dollars, sewn of synthetic nylon, held together by plastic clips, and are bound to rip at the seams after another couple of hard-working months. Then just go and interview any old carpenter or electrician who has worked 20 years and you will find a cracked, oiled, perfectly worn leather rig hanging on a nail in their garage - still in good service, still sound and still their own.
This paper will take a closer look at the attention to detail of a most conventional of tools leather belt-making, including the type of raw hides used, the burnishing of the edges, and the reason that painstaking art has made genuine leather the timeless material of serious tradesmen.
Selecting the Raw Materials: The Foundation of Quality
The life of any tool belt does not start at the workshop of the craftsman, but rather at the tannery. The work belt ought to be custom made of heavy, 810 oz hides of leather, strong enough to carry the weight of hammers, chisels, pouches of fasteners and accessories without being stretched, sagging, or torn during an entire working day. On heavy-duty jobs the strongest practical grade of bullhide is 10-12 oz vegetable-tanned, denser and thicker than usual cowhide, so that it offers the greatest resistance to stretching and sagging under the weight of the tools.
The shape of the hide is as important as the thickness of the hide. Makers of high quality tool belts take material in the "double butt" part of the hide that is the part which runs down the animal backbone and the spine since this part of the hide bears the straightest and most uniform structure of the fibres and the part which is most unlikely to stretch naturally. Abdominal or shoulder incisions can be used, but they are much more susceptible to bagging with continued pressure.
Full-Grain vs. Inferior Leather Grades: Knowing the Difference
Not all "leather" is created equal, and the distinction matters enormously when your livelihood depends on what's hanging from your waist.
| Leather Type | Source Layer | Durability | Develops Patina | Recommended for Tool Belts |
|---|---|---|---|---|
| Full-Grain | Outermost, untouched hide layer | Highest | Yes | Strongly recommended |
| Top-Grain | Outer layer, lightly sanded | High | Moderate | Acceptable |
| Genuine Leather | Inferior scraps or split layers | Low | No | Avoid |
| Bonded Leather | Shredded scraps and adhesive | Very Low | No | Avoid |
Full-grain leather is the outermost layer of a hide with all its natural markings and imperfections intact, providing maximum durability due to its strongly and tightly woven fibers — aging beautifully and developing a rich patina over time. Provenhands "Genuine leather," despite its authoritative-sounding name, is made from inferior hide splits or glued-together scraps. It is a deliberate marketing term designed to mislead buyers into believing they are purchasing a quality product when they are, in fact, getting the lowest viable grade.
- Full-Grain Leather retains the entire natural surface of the original hide. Every fiber, every oil-absorbing channel, and every structural advantage of the raw material remains fully intact. Natural scars and grain variations are not flaws — they are evidence of genuine, undoctored material.
- Genuine Leather is processed from the leftover layers after the premium top surface has been stripped away. It may look acceptable on a shop shelf but will crack, delaminate, and lose structural integrity within a season of heavy use.
The Superiority of Vegetable-Tanned Leather
After picking the right hide, it is required to be tanned which is a process which changes raw in perishable animal skin into stable workable leather. It has two predominant approaches, and the gap between them is not insignificant.
The traditional one that has been practiced thousands of years is vegetable tanning. It involves the natural tannins found in tree barks oak, chestnut and quebracho most commonly used, roots, and leaves, in a slow immersion procedure and may take any years between a few weeks and more than a year depending on the thickness of the hide. The vegetable-tanned leather is obtained by working with natural tannins present in vegetable matter (tree bark, leaves, and fruits) and thus have a more rigid and structured leather that forms a beautiful patina with time.
Chrome tanning on the other hand utilizes the chrome sulfate salts and finishes the task in less than 24 hours. Leather tanned with chrome is softer and more pliable immediately after tanning, but does not acquire the same level of patina as leather tanned using vegetable tanning and may not sustain itself in the same way over a long-term mechanical load.
For tool belts, the implications are significant:
| Property | Vegetable-Tanned | Chrome-Tanned |
|---|---|---|
| Tanning Duration | Weeks to months | 24–48 hours |
| Initial Feel | Stiff, firm | Soft, pliable |
| Longevity Under Stress | Exceptional | Moderate |
| Develops Patina | Yes — molds to wearer | Minimal |
| Water Resistance (untreated) | High | Lower |
| Environmental Impact | Lower | Higher |
A veg-tan tool belt will feel almost board-like on the first day of use. This is not a defect — it is the material at its strongest. Over weeks and months of wear, the leather absorbs the wearer's natural body oils and perspiration, softens along flex points, and gradually conforms to the exact shape of the hip. The result is a rig that fits its owner better than any mass-produced product ever could.
The Art of Precision: Cutting, Skiving, and Shaping
After finding the hide, tanning it, the tangible work of the craftsman commences. Pattern cutting: the initial step is the transfer of the exact templates onto the surface of the leather with a silver pen or a wing divider and head knife or round knife to cut clean straight lines. Leather cannot be pinned and sewing as with a fabric, each cut is final, and it has to be precise to within a millimeter.
At the overlap of tool belt panels, such as in pouch attachments, fold points and loop connections, layers of 8-10 oz leather would be piled one over the other and the resulting mass would be too thick to be sewn or folded without cracking. This is where it is necessary to have skiving.
What Is Skiving?
Skiving: This is the act of making the edges and undersides of leather pieces thin with a skiving knife or spokeshave. The leather is shaved at an angle by the craftsman, thinning it off more at the edge in such a way that when two pieces are joined the transition is smooth and the bulk that is formed is not excessive. A skived seam is flat and neatly sews and evenly allocates stress; it does not add the stress to one specific location.
Weakly or not skived joints result in pressure points, which hasten wear, and lead to the stitching pulling unevenly, and are the most widespread failure points in cheaper leather products. Skilled makers of belts consider skiving as one of the most obvious signs between a handyman and a factory worker.
Forging Unbreakable Strength: Stitching and Hardware
Only a weak seam can make a premium tool belt weak. The stitching bonding pouches, loops, and panels needs to resist not only weight, but also repetitive motion at the same time tens of thousands of times, not only the pull of the tool to be drawn in or replaced dozens of times a day, the rotary forces of bending and crouching, and the wear of rubbing against rough surfaces.
Saddle stitching is the industry standard of high-quality leatherwork, which is done with heavy-duty waxed nylon or linen thread using two needles at the same time, one through one side of the same hole. Saddle stitching is more powerful than machine stitching since when one stitch is torn the rest will not give in; in machine stitching one broken thread can easily unravel the whole seam. Amazon Waxed thread is waterproof, does not fray at the ends of the cut, and maintains its tension in changing temperatures that cause synthetic fibers to swell and shrink.
Craftsman's Note: High-stress corners — particularly the bottom corners of tool pouches where the weight of chisels or a full nail bag concentrates — are routinely reinforced with metal hardware during assembly. A corner that is stitched alone will eventually tear through the leather fibers. A corner anchored with a rivet transfers load directly to the hardware, eliminating the failure point entirely.
Stitch density matters as well. A professional tool belt will typically show 6–8 stitches per inch. Too few stitches per inch and each individual stitch bears excessive load; too many and the needle perforations weaken the leather by removing too much material. The sweet spot creates a seam that is both mechanically strong and visually precise.
Why Copper Rivets Are Non-Negotiable?
Sewing in itself is not reliable in all stress areas of a carrying tool belt. The pouch bottoms, the D-ring attachments and the shoulder suspension points all receive the form of shear force that given time, has the ability to cut even the finest saddle stitching. It is the reason why copper rivets (or nickel-plated steel) that are hand-hammered are a characteristic of a serious tool belt construction.
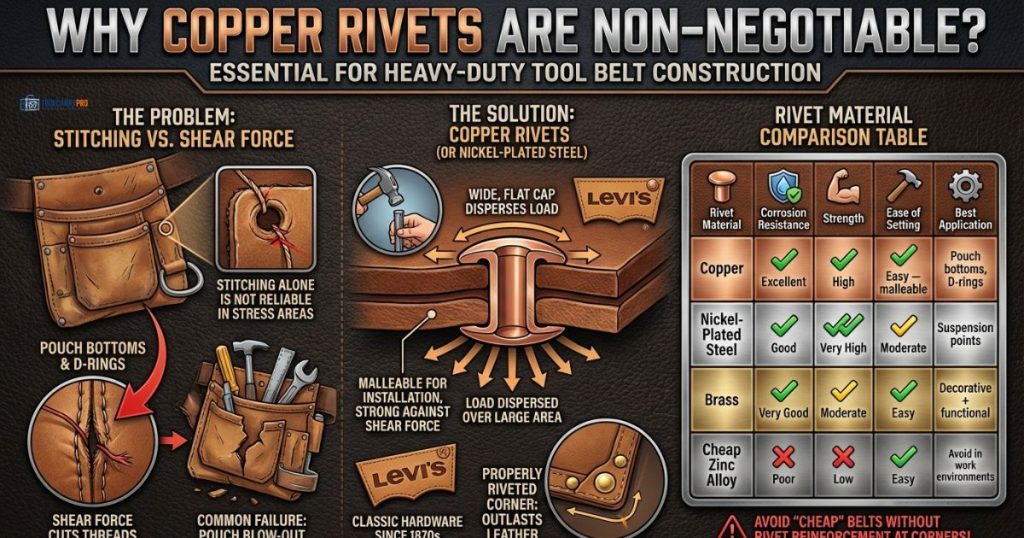
The level of hardware that propelled Levi Strauss denim to fame in the 1870s, copper rivets, are used by creating a wide, flat cap on both sides of the layers of leather being joined together and dispersing the load over a large area of surface instead of a single thread. Copper rivets are preferred in heavy-duty leather work due to being both malleable enough to install without cracking the surrounding leather, and strong enough to withstand shear forces due to the weight of heavy tools.
| Rivet Material | Corrosion Resistance | Strength | Ease of Setting | Best Application |
|---|---|---|---|---|
| Copper | Excellent | High | Easy — malleable | Pouch bottoms, D-rings |
| Nickel-Plated Steel | Good | Very High | Moderate | Suspension points |
| Brass | Very Good | Moderate | Easy | Decorative + functional |
| Cheap Zinc Alloy | Poor | Low | Easy | Avoid in work environments |
When a pouch bottom "blows out" — a common failure mode in cheap belts where the base of a pouch separates under the weight of a heavy tool load — it is almost always because the manufacturer relied on stitching alone, without rivet reinforcement at the corners. A properly riveted pouch bottom will outlast the leather surrounding it.
Sealing the Deal: Edge Burnishing and Conditioning
The edges of raw leathers are porous, absorbent, and susceptible. and left untreated the cut edge of the best full-grain hide will absorb moisture, swell, fray, and finally crumble working inwards and injuring the very support of the panel itself. The last step of an authentic leather workman is edge finishing and among the most obvious visible indications of a good construction.
The process follows a precise sequence:
Step 1 — Beveling: A beveling tool removes the sharp 90-degree corner from the cut edge, creating a gentle chamfer that reduces the surface area exposed to abrasion.
Step 2 — Sanding: The beveled edge is sanded through progressively finer grits — typically starting at 220 and finishing at 400 — to compact the leather fibers and create a smooth, uniform surface.
Step 3 — Burnishing: A wood slicker or canvas cloth is used in combination with a burnishing agent — traditionally beeswax, gum tragacanth (a natural plant-derived gum), or tokonole — to generate friction heat that fuses the exposed fibers into a sealed, polished edge. A properly burnished edge is smooth to the touch, resistant to moisture penetration, and visually indistinguishable from the face of the leather.
In checking any leather tool belt, rub your finger down the ends of the pouches and the body of the belt. An edge ground and burnished is indicative of a real work of craftsmanship. An edge that is painted or glued on is a sure sign of corners that have been cut elsewhere in the construction process as well since most production belts on the mid-range are generally cut in corners.
As noted in the Ultimate Guide to Professional Tool Belts: Selection, Organization, and Top Brands, edge finishing is one of the primary quality indicators separating a genuinely professional tool belt from a product that merely looks the part on a store shelf. It is one of the first things an experienced tradesman examines when evaluating a new rig.
The Break-In Period and Generational Longevity
Setting honest expectations matters. If you purchase a traditionally made, vegetable-tanned leather tool belt and strap it on for the first time, it will feel stiff, possibly uncomfortable, and nothing like the broken-in synthetic rigs you may be used to. This is entirely normal — and it is actually the point.
A stiff veg-tan belt on day one is a belt at maximum structural integrity. Over the first several weeks of regular use, the leather will begin its transformation:
| Time Period | What Happens to the Leather |
|---|---|
| Week 1–2 | Begins to flex at natural movement points; initial stiffness softens slightly |
| Week 3–6 | Body heat and perspiration start conditioning the leather from within |
| Month 2–3 | Belt begins conforming to the wearer's hip and waist profile |
| Month 6+ | Leather is fully broken in — ergonomic, personalized, and stronger for the wear |
| Year 2 and beyond | Patina deepens; belt becomes a custom fit unique to its owner |
It is easy to hasten this process: it is only necessary to apply a thin layer of neatsfoot oil or leather conditioner before the first use, bend the belt with their own hands, and use it on a regular basis. It should not be soaked in water during the break-in phase, which will result in even softening and warping before the fibers have an opportunity to arrange themselves to the shape of the wearer.
Properly kept traditional leather tool belt, which is oiled once per year, not subjected to long direct exposure to the sun, and kept flat or hung on a broad hook, will be in service decades. It is not rare to have quality leather work rigs passing down a tradesman to their apprentice, or parent to child, and still doing full service after 20 or 30 years of hard work. No nylon belt that is going to be created can ever say the same thing.
Conclusion and Final Thoughts
Leather that is built by hand requires more initial capital investment when compared to the artificial options - there is no denying this. However, once you take into consideration the life of a well made tool belt, the calculation turns decidedly in favour of leather. An eight dollar per year $200 traditionally made rig would last 25 years. Twenty dollars will replace a nylon belt that has a price of $40 and changes after every two seasons. Even beyond economics, there is also the matter of performance: a belt that shapes to your body, and tightens over the years, and never fails due to a full day load, is just a better tool.
You may side with the reliability and tailor-made fit of the time-proven tradition of leather, or you may prefer the lighter weight and instant portability of the new nylon, but either way we would like to hear your opinion and explain what you carry to work and why? Stop by and leave a comment below. The old versus new debate of the trades has been spanning decades and there is no correct answer to all tradesmen.
Disclaimer - No Affiliate Links: We are not using any affiliate links on this site. This blog is written solely with the aim of helping our readers to make informed unbiased decisions.